Key Takeaway
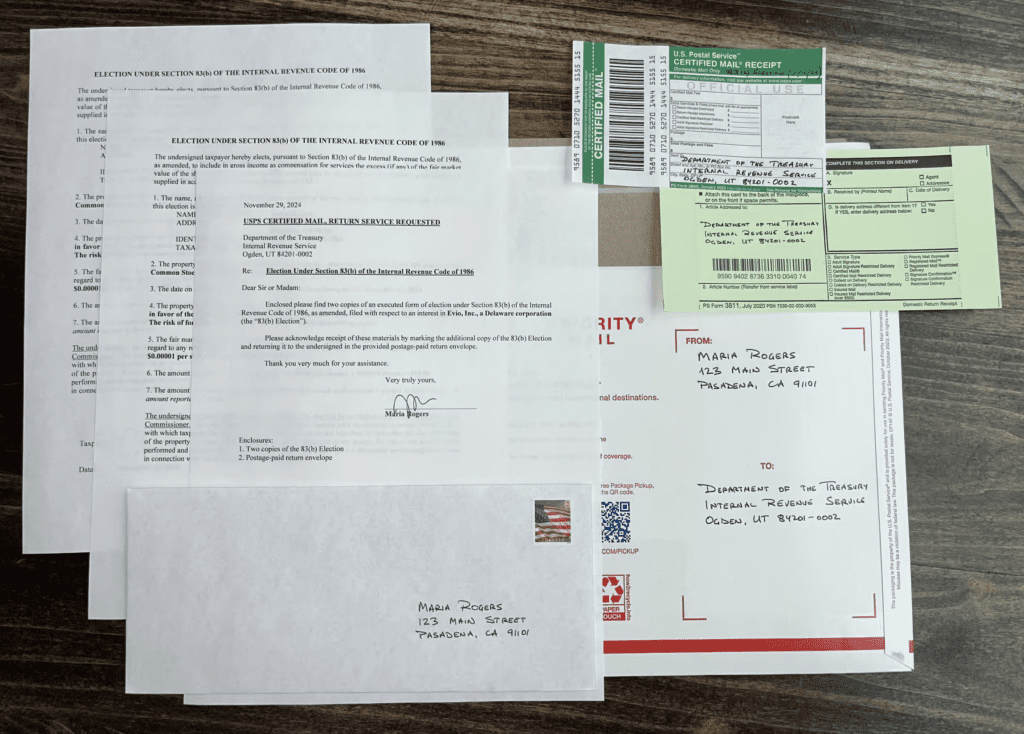
The 83(b) election has to be made on paper – there’s no electronic or fax filing. Make sure you use USPS Certified Mail or an IRS-designated private delivery service to send your package to the IRS, and maintain good records as evidence that you’ve properly made the election.
Intro
It’s one thing to think that you’ve made an 83(b) election. It’s another thing to actually make it.
Let that sink in.
Quite often, I hear people say how relieved they are to have made the 83(b) election on time. After a bit of questioning, you realize that they likely got it wrong – for instance, they didn’t use Certified Mail, or the only evidence they have of making the election is a tracking number or a credit card payment receipt (which they don’t know where they’ve placed).
At that point, it’s likely too late to fix things. You have one shot to properly make an 83(b) election for each equity grant, so you want to make sure you do it right.
For this, equity recipients have to act deliberately and methodically to not only properly make the 83(b) election, but also have the solid evidence to prove it later on if need be.
This is what this blog post is about.
Let’s go.
How to file your 83(b) election
There is a specific procedure to 83(b) election filing, and it is best to adhere to best practices. Below, you will find instructions on:
- How to prepare your 83(b) election package
- How to file with USPS Certified Mail
- How to file with an IRS-designated private delivery service
- How to keep proper records of your filing
Of course, you can avoid all this and file your 83(b) election through our service at corpora.us. If you would rather not have to go through the filing process yourself, we’ve got your back. Otherwise, if you would rather do it yourself, read on. We have laid out all the information you need.
Prepare Your 83(b) Election Package
The contents of your 83(b) election package should consist of the following:
- Your 83(b) election
- A copy of your 83(b) election
- Your cover letter
- Postage-paid return envelope
Let’s dive deeper into each of these.
Your 83(b) election
The first thing you should do is fill out your 83(b) election. You can do that in one of two ways: (i) you can either fill out the election in free form, which is the process everybody has been following for the past 10+ years, or (ii) you can fill out Form 15620 that the IRS released earlier this month.
For a detailed breakdown of the freeform statement for making an 83(b) election, check out this post that goes over each field and provides tips on how to fill in each of them.
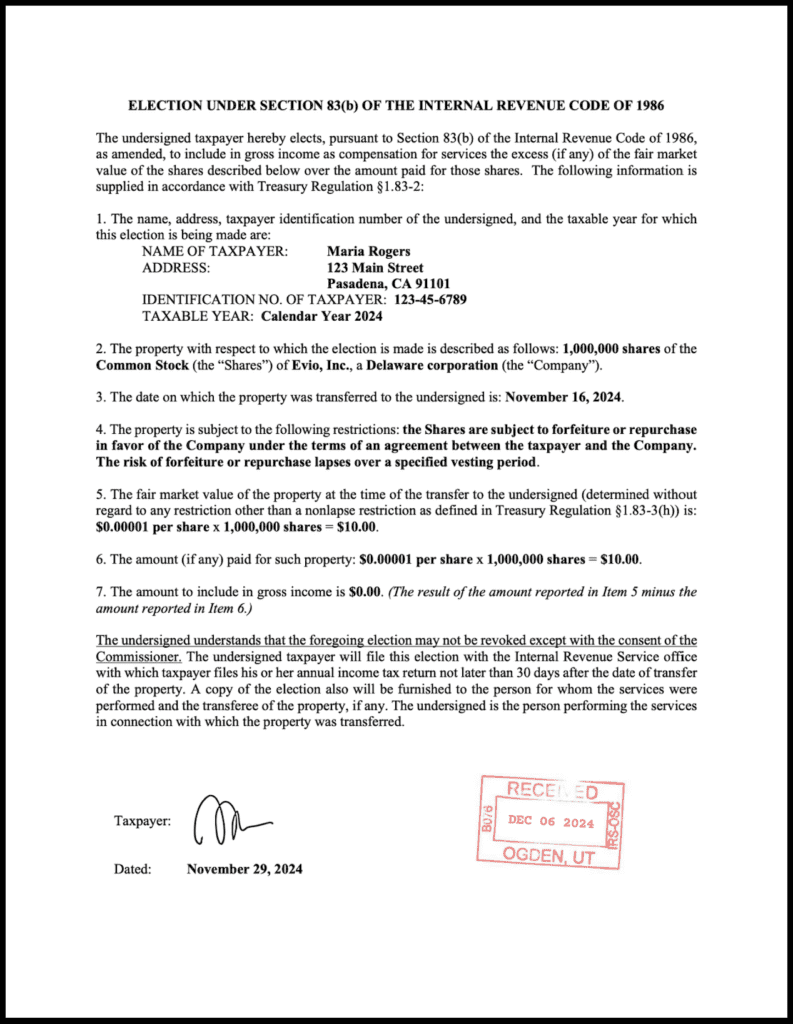
Form 15620 is very similar to the freeform statement, but asks for a few additional pieces of information: namely, the EIN (tax identification number) of the company that granted you the equity along with its address (see Item 9).
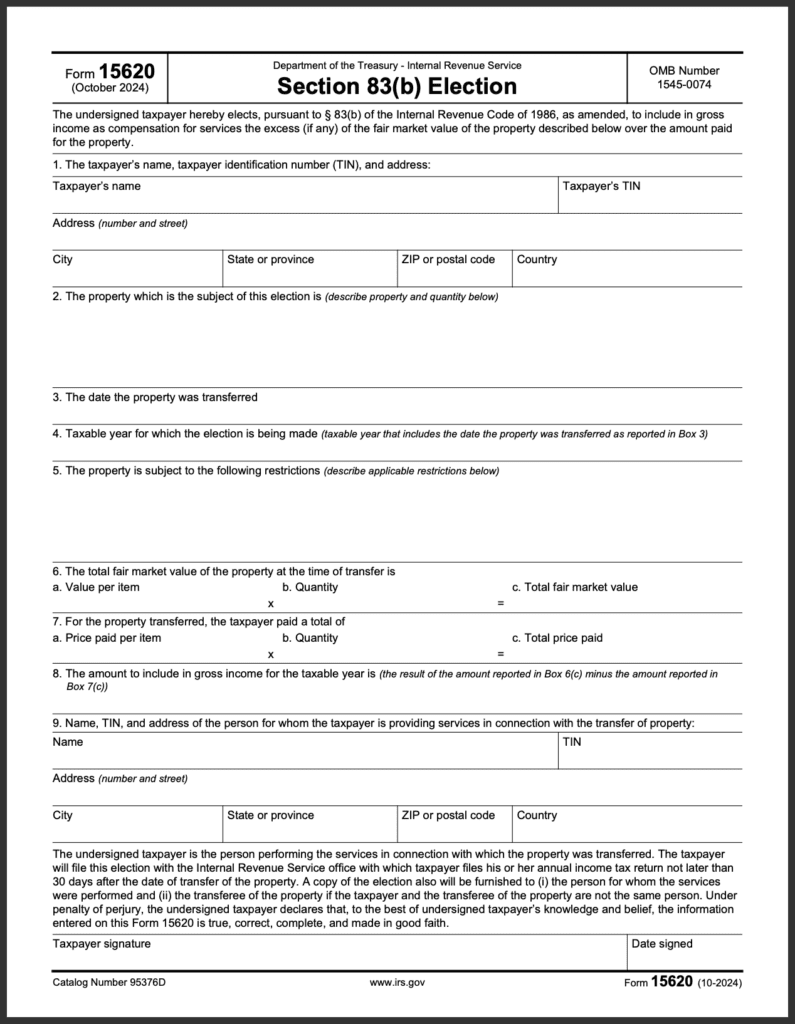
If you would like more information on the Form 15620, including its pros and cons, see our post on the topic.
Importantly, make sure you sign and date your 83(b) election.
A copy of your 83(b) election
That 83(b) election you just filled in, signed, and dated? Make a photocopy of it. You include a copy in your package so that the IRS date-stamps it and sends it back to you in the provided postage-paid return envelope, thus acknowledging receipt of your election.
Better yet, make three copies of the 83(b) election! No, seriously. While you’ll be sending one of the copies to the IRS, you should be handing over another copy of your 83(b) election to the company issuing you the equity (essentially, your employer), and you’ll be keeping the final copy for your own personal records.
Your cover letter
With the 83(b) election squared out of the way, time to turn your attention to the cover letter. The cover letter will go on top of your 83(b) election package, essentially communicating to the IRS clerk what you’re sending them and why. Here’s an example of a cover letter.
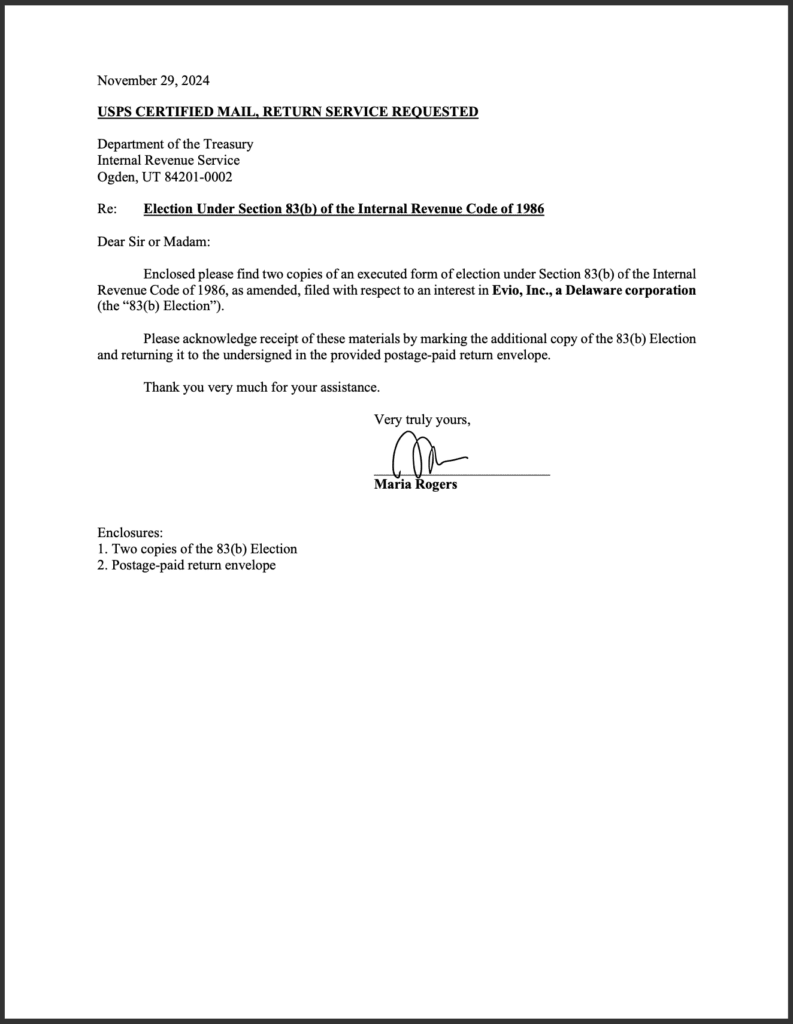
As you can see, there are a few items to include in your cover letter:
- Indicate the service you’re using to send your package
- Write the IRS Service Center address you’re sending your election to
- Say that you’re making an election under Section 83(b) of the Internal Revenue Code
- Reference the company granting you the equity in regards to which you’re making the election
- Ask the IRS to date-stamp and return the copy of your 83(b) election
- List the contents of your package, namely: two copies of the 83(b) election and a postage-paid return envelope
Importantly, make sure you sign and date the cover letter.
Postage-paid return envelope
Here are the steps to follow to get this right:
- Get a simple #9 or #10 envelope, preferably one with a privacy tint.
- Write your return address on the bottom-right corner.
- Leave the top-left corner blank.
- Place a USPS postage stamp in the top-right corner, for First Class Mail service.
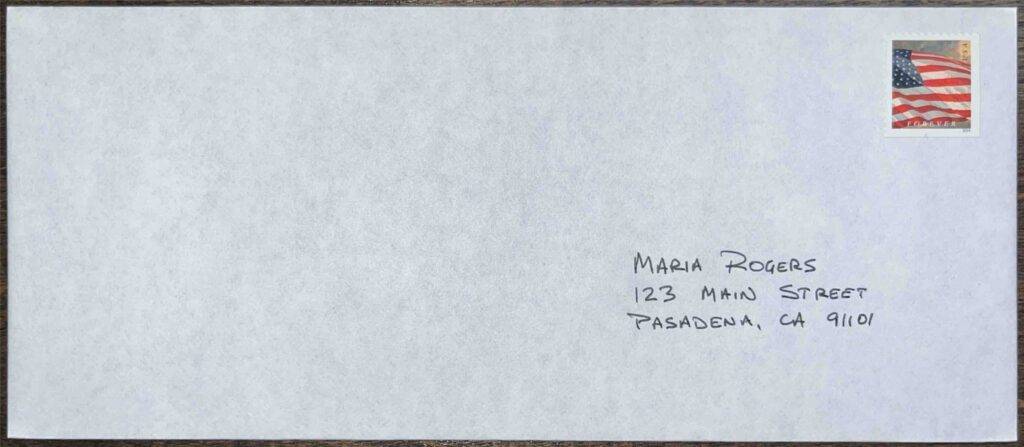
That’s it! Your postage-paid return envelope is ready.
Note that the return envelope must be intended for mailing with USPS. The IRS won’t be sending back anything via a private delivery service (such as FedEx). This may cause you some trouble if you’re sending your package from overseas with FedEx, since it means either: (i) you’ll have to have your date-stamped copy sent to a U.S. address, or (ii) include enough postage so that the mail gets to your international address (and harbor enough courage to actually rely on this return method).
For more details on making the election from abroad, check out this post.
Sending Your 83(b) Election via USPS
Ok, the first hurdle is cleared: the contents of your 83(b) election package are good to go. Now we have to put it in an envelope and send it out to the IRS. As mentioned at the top, there are two ways of doing this – one of which is with USPS.
There is one critical point to follow to make sure you get this right – and by getting it right, we mean having sufficient evidence to prove later on, should the need arise, that you actually filed the 83(b) election: sending it via USPS Certified Mail.
Send using USPS Certified Mail (or USPS Registered Mail)
We cannot stress this enough – if you’re using USPS, your 83(b) election has to be sent out using the Certified Mail service (the Registered Mail service is also an option, but it’s considerably more expensive, so we’ll stick to Certified Mail for purposes of this post).
Why is that, you ask?
Three reasons – USPS Certified Mail:
- Allows you to benefit from the “timely mailing treated as timely filing” rule,
- Acts as legal proof of mailing, and
- Acts as prima facie evidence of delivery.
However, in order to benefit from all of the above, you need what’s called a “postmarked certified mail sender’s receipt”.
What’s that?
It’s this.
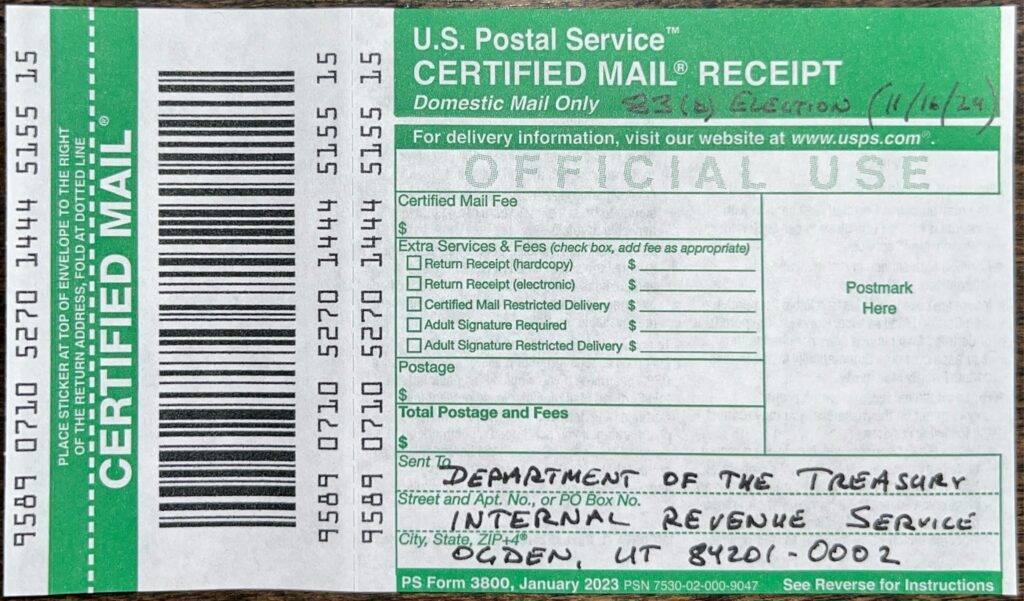
This is USPS Form 3800. You fill it in by writing out the address of the recipient at the bottom – make sure you send it to the correct IRS Service Center. You may also want to write out “83(b) election” and the date of grant at the top of the slip, so that you don’t forget what it’s for. Importantly, you absolutely positively need to get a postmark on this form by the USPS clerk when you hand over your package – that’s that red stamp you see in the right-side box in this bottom image. It’s that postmark that turns this slip into a “postmarked certified mail sender’s receipt”.
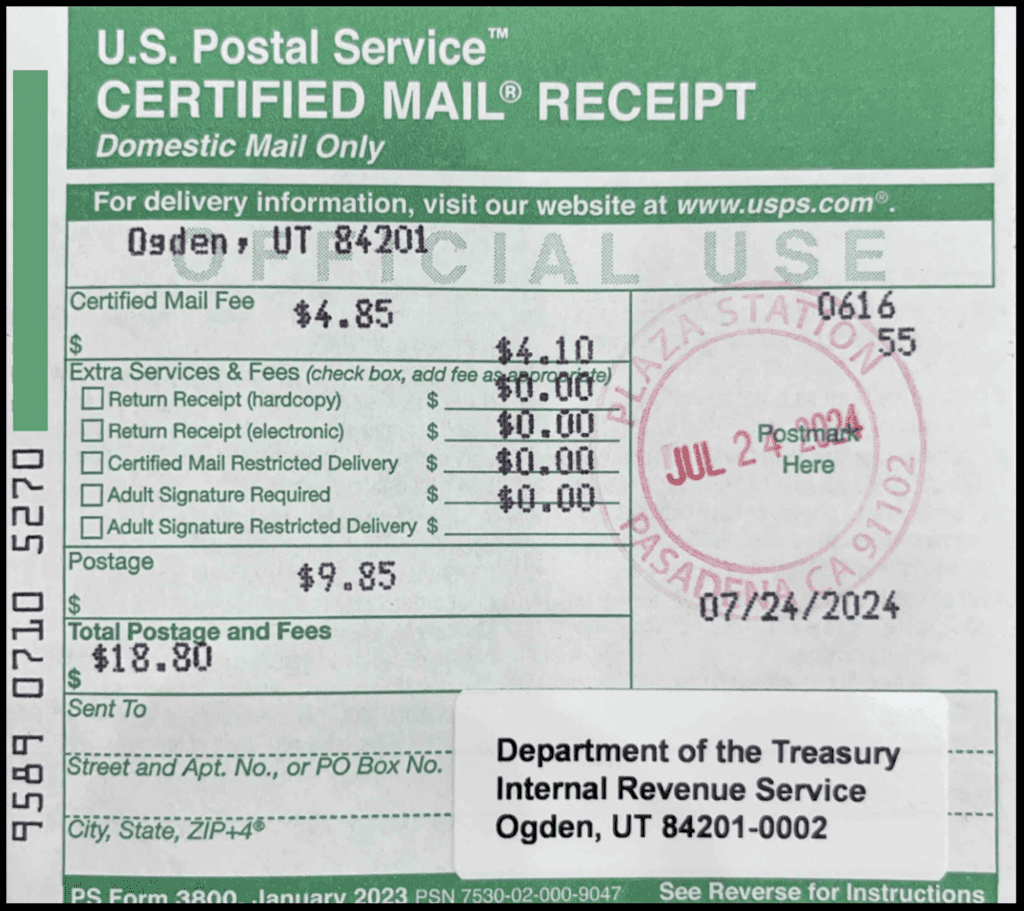
Now, let’s break down the three benefits this gives you.
- Timely mailing treated as timely filing: this means that so long as the date on that postmark is on or before the last day to file, you’re good – you’ve met the deadline.
- Legal proof of mailing: this slip will hold up in court in case there’s an issue of whether you actually sent your filing.
- Prima facie evidence of delivery: if the filing gets lost or misplaced at some point, this slip creates a rebuttable presumption that it was, in fact, delivered.
So, just to be clear – if you send your 83(b) election package as regular mail (say, First Class Mail), you will get none of these benefits (unless your package envelope gets a postmark at the post office, in which case you can benefit from the “timely mailing treated as timely filing rule”).
How about if you send it using USPS Certified Mail, but don’t get the slip postmarked? Same here, you’re likely not getting any of these benefits (again, unless your package envelope gets a postmark).
So, yeah – make sure you not only send your package using USPS Certified Mail, but also get the Form 3800 postmarked.
As of November 28, 2024, Certified Mail service costs $4.85 if purchased at the post office.
Sending with return receipt requested
An additional evidence of delivery is the “return receipt” – a slip that the recipient signs and sends back once the envelope has been received, giving the sender proof of delivery. USPS offers two types of return receipt: (i) the old-school hardcopy return receipt, also known as the “Green Card”, and (ii) the electronic return receipt – or return receipt electronic (RRE), as the USPS fancily calls it.
For purposes of our scenario, we’ll be using the hardcopy return receipt (USPS Form 3811):
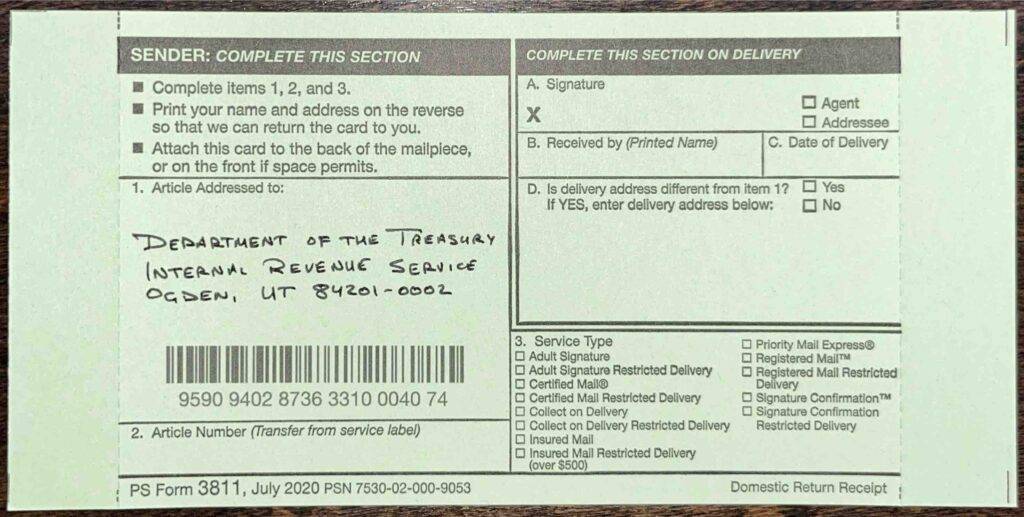
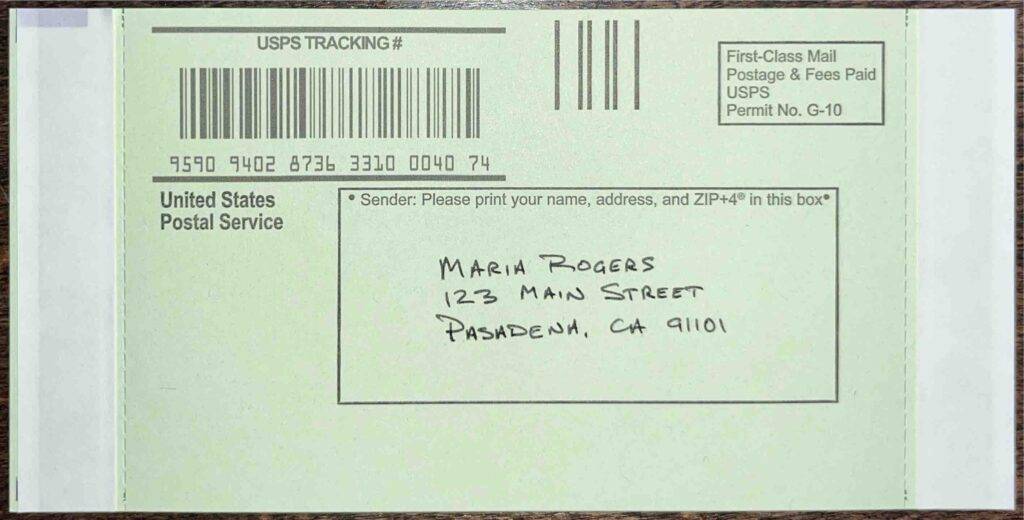
To fill it out, write out the address of the IRS Service Center you’re sending your package to on one side. On the other side, write out your return address. This card will later be affixed to your envelope. When the IRS receives your envelope, they’ll tear off the return receipt, stamp it, and send it back to you.
As of November 28, 2024, the hardcopy return receipt costs $4.10.
Consider sending via USPS Priority Mail
USPS Certified Mail, First Class Mail, Priority Mail… we know this can get really confusing, so let’s clarify this:
- First Class Mail and Priority Mail are the speed of the base service. They’re mutually exclusive. First Class Mail (aka “snail mail”) gets there in about a week. Priority Mail should get there in 1-3 business days.
- USPS Certified Mail is an add-on service. You’re asking the USPS to track your package and have the recipient sign for it when they get it, plus it gives you the benefits listed above.
Ultimately, it’s irrelevant whether you send your package via First Class Mail or Priority Mail – so long as you add on Certified Mail, you’re hitting that critical point. That said, you probably want to use Priority Mail just because it’s supposed to travel faster, and you should find out sooner whether your package got there or not (just so you can consider sending out a duplicate if necessary, which is a topic for another post).
Importantly, make sure you address your envelope to the correct IRS Service Center.
As of November 28, 2024, Priority Mail is a flat rate of $10.45 if purchased at the post office.
Piecing It All Together
Ok, home stretch! The contents of your package are ready and you’ve filled out your Certified Mail receipt, your return receipt, and your Priority Mail envelope. Here’s what you got to do:
- Place the contents in the Priority Mail envelope.
- Seal the Priority Mail envelope.
- Take the Priority Mail envelope along with the Certified Mail receipt and return receipt to the post office.
- Hand it all to the clerk – they’ll know what to do!
- Before you leave, make sure you have:
- The postmarked Certified Mail receipt, and
- USPS transaction receipt (in physical or digital form).
You can attach the Certified Mail receipt and return receipt to the envelope yourself, but you’re likely better off having the clerk do it. Here’s what it should look like if you do it yourself:
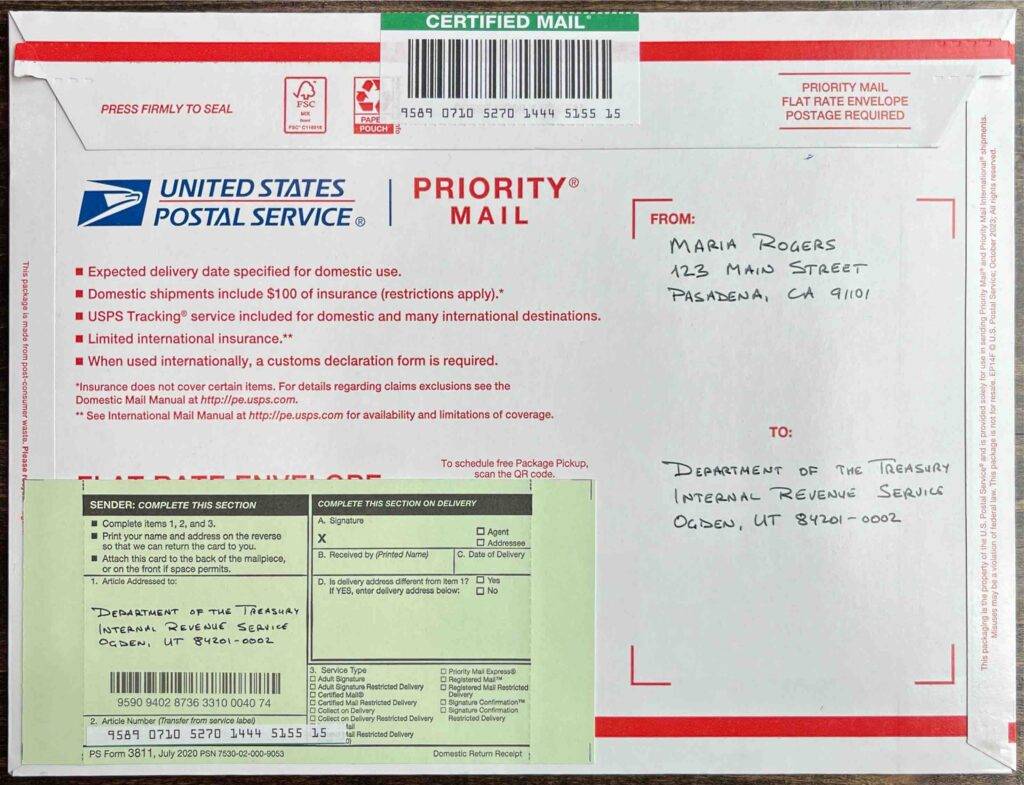
And that’s it, you’ve properly filed your 83(b) election!
But don’t rest on your laurels for too long – make sure you keep proper records. More on that below.
Sending Your 83(b) Election Using a PDS
The second way of sending your 83(b) election package to the IRS is via a private delivery service, or PDS. In case that phrase has you scratching your head, it’s basically what DHL Express, FedEx, and UPS are.
However, here’s the catch, and a critical one: you must utilize only specific, IRS-designated private delivery services if you wish to send your 83(b) election to the IRS in line with best practice. Here’s a list of the designated services:
| DHL Express | FedEx | UPS |
| DHL Express 9:00 | FedEx First Overnight | UPS Next Day Air Early A.M. |
| DHL Express 10:30 | FedEx Priority Overnight | UPS Next Day Air |
| DHL Express 12:00 | FedEx Standard Overnight | UPS Next Day Air Saver |
| DHL Express Worldwide | FedEx 2 Day | UPS 2nd Day Air |
| DHL Express Envelope | FedEx International Next Flight Out | UPS 2nd Day Air A.M. |
| DHL Import Express 10:30 | FedEx International Priority | UPS Worldwide Express Plus |
| DHL Import Express 12:00 | FedEx International First | UPS Worldwide Express |
| DHL Import Express Worldwide | FedEx International Economy |
Why, you ask?
It’s because only these specifically designated services allow you to benefit from the “timely mailing treated as timely filing” rule. To recap, this rule says that so long as you hand over your filing to the shipping service by the respective deadline, it’s considered that you’ve made your filing on time, regardless of when the IRS actually receives it.
Just to really drive it home: taxpayers have been burned by using a non-designated PDS when sending documents to the IRS. Want horror stories? Check out this instance and this other one.
Keeping records with USPS
All this would be for naught if you don’t keep solid records! Here’s what you’re looking for if you’re mailing out your package with USPS.
- Remember, you don’t walk away from the post office counter without:
- your postmarked certified mail receipt, and
- your transaction receipt (printed out or emailed to you).
- After a day or two, start checking your tracking number (on your certified mail receipt or the transaction receipt). Once it shows as delivered, make a screenshot or PDF printout of that page.
- The hardcopy return receipt will be coming in the mail. Make a scanned copy once it comes through.
- Finally, after about a month or two, you should be getting the IRS date-stamped copy of your 83(b) election! Make a scanned copy once it comes through.
Here’s what the date-stamped copy should look like:
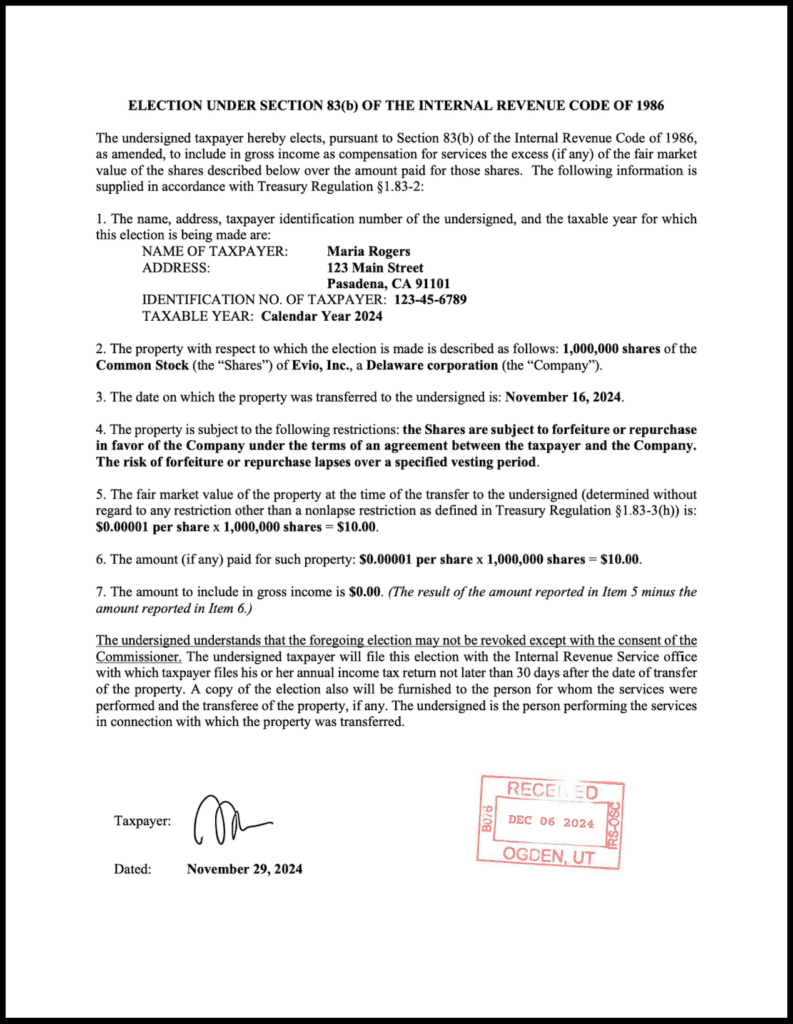
Scan all physical documents. Hang on to both the physical and digital documents.
What if I don’t get a date-stamped copy? Or I get the copy, but it’s not date-stamped?
No need to worry. Requesting and receiving a date-stamped copy of your 83(b) election back from the IRS is not a requirement to properly making an 83(b) election. Instead, it’s requested simply as additional proof that the IRS received your filing. Your primary proof of mailing and delivery would be your postmarked certified mail receipt and return receipt electronic (in case you used USPS Certified Mail) or the respective electronic record and proof of delivery of your shipment (in case you used an IRS-designated private delivery service).
Am I required to keep the physical copy of my IRS date-stamped 83(b) election?
No, you are not required to keep the physical copy for your IRS date-stamped 83(b) election for it to be valid; the scanned copy should suffice for record-keeping purposes. You may choose to keep the physical copy in any case if you’d like to be particularly diligent. For example, the physical copy may come in handy if the authenticity of the scanned copy is challenged (say, in an audit or court). Ultimately, it’s a matter of personal preference. In case of doubt, speak with your legal or tax advisor.
File Online With Corpora
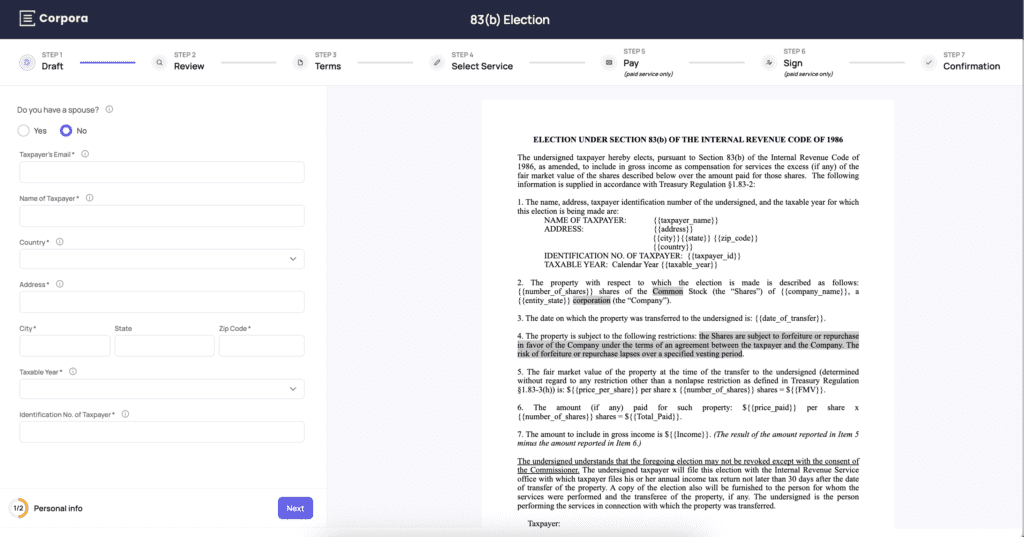
We know how painstaking this process can be, easily taking up to 5 hours (if not more!) of your time to prepare, send out, track, and maintain the records of your 83(b) election package. This is why we created an automated tool that helps equity recipients properly file their 83(b) election within a matter of minutes and with peace of mind.
We do things by the book here at Corpora. As a result, equity recipients from around the world have trusted us with over 1,000 83(b) elections. Get started on yours today at 83b.corpora.us/file83b.
Conclusion
If only making an 83(b) election was a matter of signing a sheet of paper, placing it in a stamped envelope, and dropping it in a mailbox (I mean, you can still do that if you like to live on the wild side).
There’s a best practice protocol to follow if you want to get this right and to do so in a way that withstands challenges in the future. The fact of the matter is that if there is something wrong with the way you filed your 83(b) election, you likely won’t know about it until years after you send it in – long after any possibility of fixing mistakes.
You have one chance to get it right, so you want to be sure you do.

